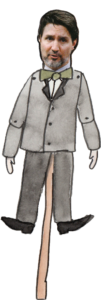
 These flat puppet likenesses (and puppets more broadly) are an effective way to draw attention to an issue that relates to a specific person or group of people (e.g., politicians). They can also be used with street theater.
There are many different ways to make puppets, especially large puppets, but the instructions here are for flat cardboard puppets, because they are simple and a fairly quick way to make puppets.
In this how-to we suggest having a photograph of the head, or the head and torso if you can. This is because it is visually compelling and makes it easy to recognize the person.
STEP ONE: GATHER SUPPLIES
- Large pieces of cardboard
-
- Try to get appliance or furniture boxes
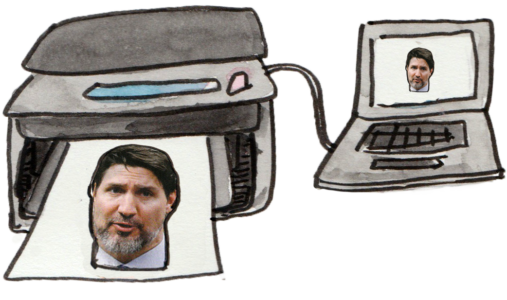 Lifesize high-resolution print-out of the person (or people) that you want to make a flat puppet of.
 -
- Find a high resolution image online or scan a printed photograph at least 300 dpi. You don’t want the image to look pixelated when you print it out.
- You can decide whether to print in color or black and white.
- You can print out just the head of the person and paint the rest of their body or you can print an image that includes their head and torso and use that as the puppet.
- If you want to print head and torso, a large format printer would be best to do it on one large sheet. You can get large format printing done at print shops and if you have a bigger budget you can get them printed in color.
- The cheapest option is to print just the face(s) at home.
- If you don’t have access to, or budget for, a large format printer to print a large head and body photo, another option is to print the image at home in sections and tile the image together.
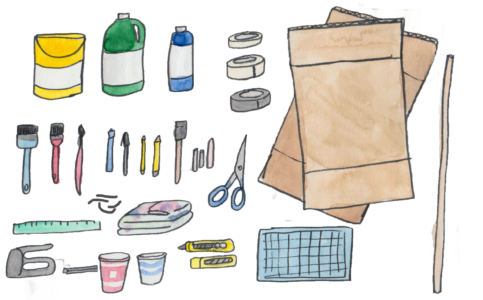 Acrylic or latex paint
Get bright strong colors of latex house paint or large (½-1 gallon) containers of acrylic. If paint is thick, thin it with about 1 part water to 3 parts paint, so it flows easily, but still covers solidly. You can pour paint into quart- sized yogurt style containers and use foam/bristle brushes of various sizes. Set paint containers on a piece of cardboard so if you drip, wipe off right away with a wet rag. Make sure to paint out any heavily painted areas where paint has pooled, so it will dry faster.- Paintbrushes (have a variety of sizes, and make sure they are in good shape – not frayed)
- Utility knife and extra blades
- Cutting mat (or surface for using utility knife)
- Scissors
- Yogurt containers for water and paint (and some lids)
- White glue or wheat paste mixture
- Drop cloth
- Pencil
- Masking tape (the wider rolls are better, good quality to be sure the tape sticks)
- Ruler(s)
- Sticks/poles (8 feet /2.5 m – can be cut in half or to other lengths)
- Latex varnish or clear acrylic medium (optional – to paint a clear coat for increased weather durability)
- Rubber ties (can be cut from old bicycle inner tubes)
STEP TWO: PASTE, DRAW AND CUT
Photo head and painted body
- Cut out the head photo and white glue or wheat-paste it to the top of your cardboard.
- Draw the neck and torso/body attached to the head. You can exaggerate the outfit or features of the outfit for effect.
- Draw the arms in sections separately. You can draw the legs on the same piece of cardboard as the head and torso if the cardboard is big enough, or draw them separately and attach in step five.
- Once you have all your shapes drawn, cut everything out of the cardboard.
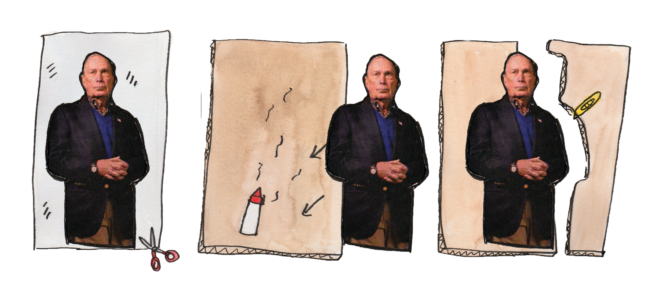
Photo head and torso
-
- If you are using a printed head and torso, cut the image out and glue or wheat-paste it to a piece of cardboard. Then cut it out with the utility knife.
- If you have enough cardboard and want your flat puppet to be more durable, cut the shape of the head and body out of a second layer of cardboard, and then the two sheets of cardboard can be taped together, similar to the cardboard sign instructions.
STEP THREE: PAINT
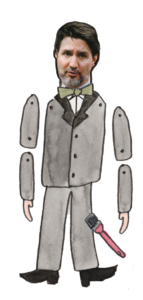 Photo head and painted body
- Paint in your drawing of the body, arms and legs using acrylic or latex paint.
Photo head and torso
- If you printed out the whole head and torso, you can paint with a clear coat for increased weather resistance (something such as your wheatpaste mixture if it’s clear, a varnish or clear acrylic medium). This is optional.
If you printed your image in black and white you can paint a wash on top of the photo to add some color. A wash is a watered down paint, so you aren’t covering up the whole photograph with thick paint. If you do a wash don’t make it so watery that it wrecks the image. Test out your wash out on some cardboard and photo scraps before you paint on the flat puppet.
Let the paint dry completely – for as long as you can. For the first week try not to compress tightly or fold so paint is touching paint. The fresh paint can still be a little tacky and stick to itself.
STEP FOUR: ACCESSORIES
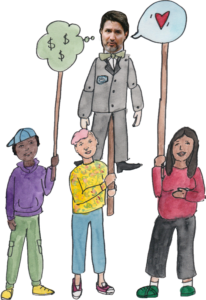
 Use accessories to help share your message. You can create accessories with leftover cardboard or find other props to attach to the flat puppet. Props can also be attached to their own stick to be held beside the flat puppet.
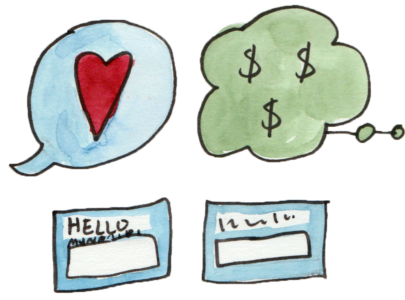
- Speech bubbles – Can be used to draw attention to something someone has said. Use real quotes. Quotes can be on cardboard signs on their own sticks.
- Thought bubbles – What are they really thinking? You can connect the different parts of the bubble together with wire or thin sticks taped to the back of the cardboard pieces.
- Money – You can put money into politicians hands. These can either be painted or photocopied. If you put a wire hook on the hand these can be removable. Velcro works too.
- Name tags – It’s a good idea to put the person’s name directly on them, in case people don’t know who it is. This also makes sure their name gets into photos and newspapers.
- Signs – Flat puppets can carry their own signs. Attach them to both hands and they can swing (e.g., salary $10,000,000).
- Fat cats – Flat puppets can have friends. Who do they spend time with? These can just be painted cardboard on a stick.
STEP FIVE: ASSEMBLE
Have all your parts ready:
- Painted body and photo head, (and possibly legs) made from a single piece of cardboard.
- Arms (and possibly legs) as separate cardboard sections.
Attach the arms to the body using rubber ties (bicycle inner tubes cut into strips). Have small holes at the joints where you want pieces to attach and run the tie through the overlapping holes. Tie big knots on each side of the rubber ties so they don’t slip through. This allows the arms to swing and be moved.
Mount on pole
- Attach your pole to the back using staples with glue (waterproof if it may get rained on) or by making small holes through the cardboard on either side of the pole and running a rubber tie through the holes and around the pole and tying in a knot. Do this in three places on the flat puppet. To make the cardboard stronger, you can add extra pieces of cardboard between the pole and flat puppet (rubber ties should pass through these too). This can stop the cardboard from ripping out.
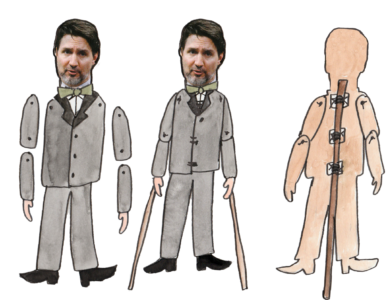
- Hand poles optional. This allows arms to be raised.
- If using rubber ties to attach, put them in areas of the clothing where they blend in.
STEP SIX: TAKE TO THE STREETS
It’s great to use the flat puppets as part of a larger plan to confront a person or bring attention to an issue, so you can strategically plan to make these to accompany a campaign or action.
Get plenty of people to volunteer ahead to carry the flat puppets. You can have people trade off during an event if they are holding them for a long time. Practice standing and then moving together. Arrange the flat puppets together in a visible space as part of your demonstration.
Place other visuals, accessories or people in front and below them. Hold the flat puppets above head level so the whole body/message is visible. You can put them up on 8 feet/2.5 m sticks to make it easy to keep them high. Be intentional and creative with your choreography. For example, they could move, slow motion, single file around the space, turned to face the people/camera/public. The people holding them are part of the visual/puppet, so it’s great if those folks can be focussed and only do that and not have other tasks.