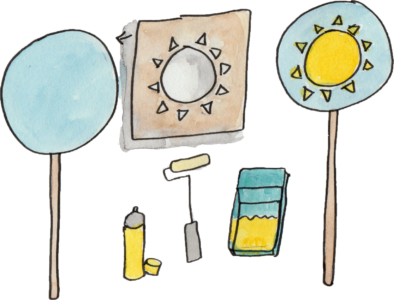
 STEP ONE: GATHER SUPPLIES
- Cardboard (Large pieces are better)
- Utility knife and extra blades
- Cutting mat (or surface for using utility knife)
- Scissors
- Stapler
- Acrylic or latex paint
Old latex house paint works great for cardboard signs. You can also use acrylic paint (the kind artists use, and available in most art shops). Don’t use oil-based paints because they are difficult to clean up, they smell badly, and they dry slowly. Tempera paints aren’t good either, because they aren’t permanent and will run and wash away if the sign gets wet. - Paintbrushes (have a variety of sizes, and make sure they are in good shape, i.e., not frayed)
- Yogurt containers for water and paint (with lids, if available)
- Drop cloth
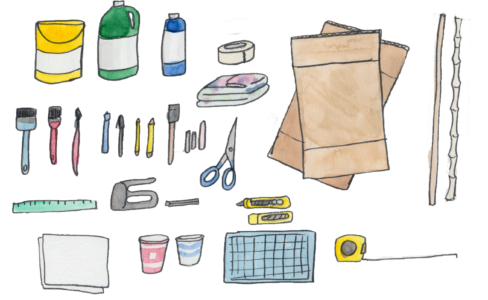
- Pencils
- Paper
- Masking tape (the wider rolls are better; don’t get the cheapest tape as it often lacks effective adhesive)
- Wood glue or white glue
- Ruler
- Sticks or poles (Between 1 – 2.5 m, 3-8 feet – based on how tall you want the signs)
STEP TWO: DRAW AND CUT OUT SHAPES
- Design your image on scrap paper and then scale and draw it on the cardboard. Use the ruler for straight lines and even distances. For circles you can draw around a big bucket, a lid, or use a pencil tied to a string like a compass.
- Draw and cut out the first side, and then trace the shape onto another piece of cardboard for the second side. (This makes the two sides symmetrical as you’ll later attach them back-to-back.) Keep any text or images printed on the cardboard on the inside of the sign and the clean side of the cardboard to the outside of the sign.
- Cut the cardboard out with a utility knife with a sharp blade with a cutting mat underneath, or some heavy duty scissors.
- If you are making many signs you can keep tracing the original.
- If you are making something like sunflowers the pole can act as the stem and you can add cardboard leaves partway down the pole.
These are the steps for double sided signs, which are great because the message can be read from both the front and the back and the signs are sturdier. Cardboard signs can also be made single sided which is faster and simpler, so decide based on the amount of time you have and if you will reuse the signs often. Here is a demo in this video starting around 1:25. https://vimeo.com/161333820
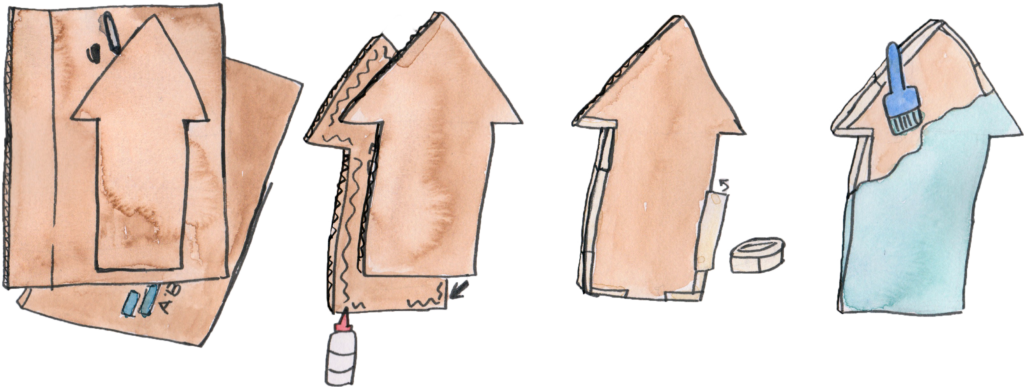
STEP THREE: GLUE AND TAPE
- First glue your two pieces of cardboard together. Put white glue or wood glue near edge of the shapes and sandwich two cut-outs together. Leave about 5 cm/ 2 inches at the bottom of the shapes unglued– this will be your opening to slide in a stick. Make a pencil mark on the outside of the sign so you know where the unglued section is.
- Next use masking tape (2 inch/5cm width) to tape around the glued edges, leaving the unglued part untaped for the pole. Put half of the tape on one side, folding the other half over to the other side of the sign. Cut the masking tape with scissors instead of ripping it to help the edges look clean.
STEP FOUR: PAINT BACKGROUND
- Paint background with acrylic or latex paint. Paint both sides and the edges. Depending on the paint quality and opacity, you may need two coats of paint.
- Semigloss paint can handle rain best!
- You can also paint the poles so they are colorful too!
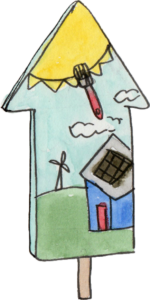 STEP FIVE: ADD LETTERING AND DETAILS
After the background is dry paint the text and any missing details, like messaging you’re using, or detail in the object. Draw your design out on paper first. Both painting and stenciling work well on cardboard signs. Decorate both sides of the sign so it can be read in both directions.
- Paint
Aim for high contrast between background and text colors to help make the text visible. Keep all slogans or phrases short and bold. - Stencil
If you are making many signs that are the same size and with the same message(s), you can make a stencil for your design. You can then spray paint or use a roller to stencil the design onto your signs.
STEP SIX: ATTACH TO POLE
- You can use any length of flat or round pole, but taller is great for getting the signs above heads in a crowd.
- To attach the pole gently pry open the un-glued, untaped bottom of the sign and slide the pole between the layers, all the way to the top of the sign. If it the tape tears or the pole won’t slide in easily, you can cut the top of your pole into a 45 degree point and/or put duct tape over the tip so the sign slides on easily. If you are attaching leaves to the pole, you can staple and glue them on.
- You can staple the poles in place if they feel loose at all, but if you want to be able to take the poles out easily (for transport or re-use) don’t staple them in until you are ready to use them.
- You can leave some signs to be hand held without a pole for variety, depending on the event.
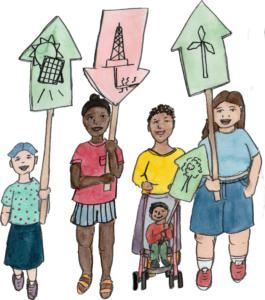
STEP SEVEN: CARRY!
- Have all your signs ready to go for your event. It looks good to have a group of people carrying the signs close together for a strong visual impact.
- Make sure you get some good photos of the signs to share on social media!